Create a timesheet custom input in......
Create a timesheet custom input in Angular with ControlValueAccessor
Create a timesheet custom input in Angular with ControlValueAccessor

Introduction
When I started developing with Angular, I struggled to complete a task where I had to create several input fields for compiling a weekly timesheet.
The main problem was the need to constantly convert timesheet entries from the common HH:MM format to a float number format for calculations. I also needed to address the inverse problem: converting float numbers received from the backend back into the HH:MM format to populate the entries during page load.
Initially, I solved the problem using RxJs. However, now that I am more confident with Angular’s functionalities, I’ve tried a different approach that, in my opinion, ensures better encapsulation and separation of concerns. This approach involves creating a custom input that leverages the ControlValueAccessor interface to create a custom reactive control.
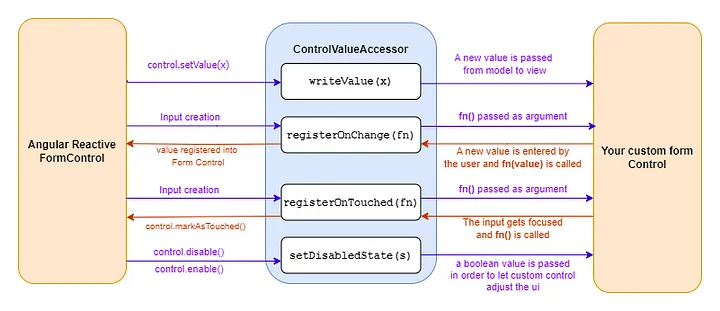
ControlValueAccessor: Overview and Implemented Methods
The ControlValueAccessor interface involves implementing four methods to enable communication between your custom form control and Angular’s Reactive Forms APIs. These methods are:
writeValue(newControlValue)→This method is invoked whenever the value of the Angular reactiveFormControlchanges. Its purpose is to notify your custom control when a value is updated in the model and needs to be reflected in the view. For example, the writeValue() method is invoked when you first initialize the formControl, likeparentControl = new FormControl<number>(0, [Validators.required])or when you callparentControl.setValue(4).registerOnChange(fn)→ In my opinion, this is the most difficult method of the interface to understand. When theFormControlis initially created,registerOnChange(fn)is invoked with an argument, conventionally namedfn. This argument is a function that we need to call to notify a change in value from the view to the model. To make things clear, in most cases you should implement the following steps in your custom formControls:
- Save the fn variable inside a class property, so you can call it later when the user updates the value of the input from the view.
- Implement the logic to intercept when the user changes the value.
- Call the fn from the class property you stored before to communicate to the Angular
FormControlto store a new value. See the example below:
export class MyCustomInput implements ControlValueAccessor {
//...other methods

//onChange is the class property were you will store fn
onChange!: (value: yourInputType) => void;

//Step 1
registerOnChange(fn) {
  this.onChange = fn;
}

//Step 2 (event binding in the template.html to this method)
onUserInput(newUserValue: T) {
  //Step 3
  this.onChange(newUserValue);
}
registerOnTouched(fn)→Once you understand howregisterOnChange()works, this one will be as easy as eating candy. It works similarly: it registers thefncallback, which you need to store in a class property, and then invoke to notify the parent FormControl that the custom control has been touched.setDisableState(isDisabled)→ The implementation of this method is optional. It is invoked whenever the status of the parentFormControlchanges betweenDISABLEDand another state (remember thatINVALIDstill means the control is enabled) and vice versa. The argumentisDisabledis a boolean set totruewhen the parent control'sdisable()function is invoked, andfalsewhenenable()is invoked.
My implementation of ControlValueAccessor: timesheet input
Now that we have a clear understanding of how ControlValueAccessor works, let’s see some code in action. If you have any feedback about it please let me know in the comments:
//timehseet.component.ts
  implements ControlValueAccessor, OnDestroy, AfterViewInit
{
  readonly #timeEntryRegex = /[0-2]*[0-9]+:[0-5]{1}([0-9]{1})?/;
  #destroy: Subject<void> = new Subject();
  #injector = inject(Injector);
  #parentControl!: AbstractControl | null;

  invalidClasses = input<string[]>();

  innerControl = new FormControl<string>('', { updateOn: 'blur' });

  isInvalid = false;
  isDisabled = false;
  isTouched = false;

  onTouch: (() => void) | undefined;

  writeValue(timeEntry: number | null): void {
    this.innerControl.setValue(this.fromFloatToString(timeEntry));
  }

  registerOnChange(fn: any): void {
    this.innerControl.valueChanges
      .pipe(
        takeUntil(this.#destroy),
        tap(() => {
          this.isTouched = true;
          this.onTouch && this.onTouch();
        }),
        map((rawEntry) => this.convertEntry(rawEntry))
      )
      .subscribe((formattedEntry) => {
        this.innerControl.setValue(
          this.fromFloatToString(formattedEntry) || '',
          {
            emitEvent: false,
          }
        );

        fn(formattedEntry);
      });
  }

  registerOnTouched(fn: any): void {
    this.onTouch = fn;
  }

  setDisabledState(isDisabled: boolean): void {
    isDisabled ? this.innerControl.disable() : this.innerControl.enable();
  }

  markAsTouched() {
    this.isTouched = true;
    this.#parentControl?.updateValueAndValidity({
      onlySelf: true,
    });
    this.onTouch && this.onTouch();
  }

  ngOnDestroy(): void {
    this.#destroy.next();
    this.#destroy.complete();
  }

  ngAfterViewInit(): void {
    this.#parentControl = this.#injector.get(NgControl).control;

    this.#parentControl?.statusChanges
      .pipe(
        takeUntil(this.#destroy),
        filter(() => this.isTouched),
        map((status) => status === 'INVALID'),
        filter((isInvalid) => isInvalid !== this.isInvalid)
      )
      .subscribe((isInvalid: boolean) => {
        this.isInvalid = isInvalid;
      });
  }

  private convertEntry(rawEntry: string | null): number | null {
    //converts the inputEntry from a string to a number if the entry is valid.
    //returns null otherwise
  }

  private fromStringToFloat(timesheetEntry: string) {
    //....
  }

  private fromFloatToString(entryHours: number | null) {
   //...
  }
}
<!-- timesheet.component.html-->
<input
  [ngClass]="isInvalid ? invalidClasses() : ''"
  type="text"
  class="form-control"
  (blur)="markAsTouched()"
  [formControl]="innerControl"
/>
Notes
As you can see, I’ve basically created an inner FormControl that is responsable of handling the text format of the timesheet entry.
- When a new value arrives from the model and the
writeValue()function is invoked, I simply set a new value for innerControl after converting it through the utility functionfromFloatToString() - When the user inputs a timesheet entry, I first try to convert it to a float, considering all possible input formats (valid cases could be 3, 3:00, 3.0), generating the
formattedEntryvariable. Then I set theinnerControlvalue to the newly generated value in theHH:MMformat (or an empty string if the entered value was invalid), while simultaneously notifying theparentControlto update its value to the float number generated byformattedEntryby invokingfn(formattedEntry). - As you can see from the code, in this case I’m not storing the OnChange function, but that’s because I’m able to call it every time from inside the subscription.
- Remember to add the following code to your customInput’s providers array:
@Component({
  selector: 'app-timesheet-input',
  standalone: true,
  imports: [ReactiveFormsModule, NgClass],
  templateUrl: './timesheet-input.component.html',
  styleUrl: './timesheet-input.component.css',
  providers: [
    {
      provide: NG_VALUE_ACCESSOR,
      useExisting: forwardRef(() => TimesheetInputComponent),
      multi: true,
    },
  ],
})
This code will enable your custom component to receive a formControlName directive. For more information about DI of a custom formControl, check this resource.