Understanding Dependency Injection in Angular
Understanding Dependency Injection in Angular
Understanding Dependency Injection in Angular
Dependency Injection (DI) is a core concept in Angular that allows for better organization, management, and testing of your code. In this blog post, we'll explore what DI is, how it works in Angular, and provide practical examples to help you implement it in your projects.
What is Dependency Injection?
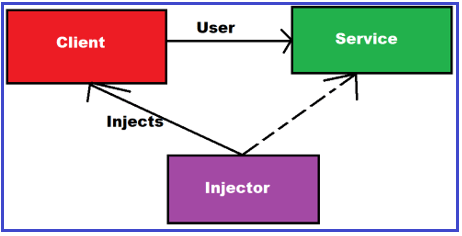
Dependency Injection is a design pattern used to implement Inversion of Control (IoC) between classes and their dependencies. Instead of creating dependencies manually, they are injected into a class, making the class more modular, testable, and maintainable.
Why Use Dependency Injection?
- Improved Code Maintainability: By decoupling class dependencies, you can easily update or replace dependencies without changing the dependent classes.
- Enhanced Testability: DI makes it easier to mock dependencies during unit testing.
- Better Code Organization: Dependencies are defined in a central location, making it easier to understand and manage them.
How Does Dependency Injection Work in Angular?
Angular provides a built-in dependency injection framework. Here's a breakdown of how it works:
- Providers: A provider is a way to register dependencies with Angular's DI system. Providers can be registered at different levels: root, component, or module.
- Injectors: An injector is a container that holds the dependencies and is responsible for creating instances of services.
- Tokens: Tokens are used to uniquely identify a dependency in the injector.
Setting Up Dependency Injection in Angular
Let's go through a simple example to understand how to set up and use dependency injection in an Angular application.
Step 1: Create a Service
First, we'll create a service that we want to inject into our components.
typescript

Copy code
// src/app/services/logger.service.ts
import { Injectable } from '@angular/core';

@Injectable({
  providedIn: 'root',
})
export class LoggerService {
  log(message: string): void {
    console.log(`LoggerService: ${message}`);
  }
}
In this example, the LoggerService is decorated with @Injectable, and it's provided in the root injector, making it available application-wide.
Step 2: Inject the Service into a Component
Next, we'll inject the LoggerService into a component.
typescript

Copy code
// src/app/components/example/example.component.ts
import { Component, OnInit } from '@angular/core';
import { LoggerService } from '../../services/logger.service';

@Component({
  selector: 'app-example',
  templateUrl: './example.component.html',
  styleUrls: ['./example.component.css'],
})
export class ExampleComponent implements OnInit {
  constructor(private logger: LoggerService) {}

  ngOnInit(): void {
    this.logger.log('ExampleComponent initialized');
  }
}
Here, the LoggerService is injected into the ExampleComponent via the constructor. The logger instance can then be used within the component.
Step 3: Use the Service
Finally, you can use the injected service in your component's logic.
typescript

Copy code
// src/app/components/example/example.component.ts
export class ExampleComponent implements OnInit {
  constructor(private logger: LoggerService) {}

  ngOnInit(): void {
    this.logger.log('ExampleComponent initialized');
  }

  someMethod(): void {
    this.logger.log('someMethod called');
  }
}
Advanced Topics
Providing Services in Modules
You can also provide services at the module level. This is useful when you want to limit the scope of a service to a specific feature module.
typescript

Copy code
// src/app/feature/feature.module.ts
import { NgModule } from '@angular/core';
import { CommonModule } from '@angular/common';
import { FeatureComponent } from './feature.component';
import { FeatureService } from './feature.service';

@NgModule({
  declarations: [FeatureComponent],
  imports: [CommonModule],
  providers: [FeatureService],
})
export class FeatureModule {}
Using Injection Tokens
For more complex scenarios, such as injecting configuration objects, you can use InjectionToken.
typescript

Copy code
// src/app/app.module.ts
import { NgModule, InjectionToken } from '@angular/core';

export const APP_CONFIG = new InjectionToken<AppConfig>('app.config');

export interface AppConfig {
  apiEndpoint: string;
}

const config: AppConfig = {
  apiEndpoint: 'https://api.example.com',
};

@NgModule({
  providers: [{ provide: APP_CONFIG, useValue: config }],
})
export class AppModule {}
Conclusion
Dependency Injection is a powerful feature in Angular that promotes better code organization, maintainability, and testability. By understanding and leveraging DI, you can create more modular and scalable applications. We hope this guide has provided you with a clear understanding of how DI works in Angular and how to implement it in your projects.